

Autosum is a very handy tool in Excel to sum cells very fast. Autosum adds up a range of numbers automatically and places the result in a nearby cell. To perform Autosum, click a nearby cell and click Autosum on the Home tab and press Enter. In this tutorial, you will learn how to use autosum in Excel.
How to AutoSum in Excel
You can use the autosum feature from two locations in the ribbon.
- Home > (Editing) AutoSum
Or
- Formulas > (Function Library) AutoSum
Examples of Autosum
How to Autosum a column in Excel
In the following example, you have the monthly sales for the first quarter of the year. To find the total sales using Autosum:
- Click on cell B8 with your mouse.
- Click on Home > (Editing) Autosum. You can also press Alt + = (Windows) or Option + Cmd (Mac).
- Excel will automatically select the cells B2:B5 and put it in a SUM function.
- Press Enter. Cell B8 will now have the sum of B2:B5.
Keep in mind when you click Autosum, Excel will include the empty cells B6 and B7 in the selection. This can be handy if you decide to add more rows in the future. To stop having the empty cells in the selection, select cell B2:B5 before clicking Autosum.
How to Autosum Cells in Multiple Columns in Excel
In this example, we have the fruit sales for the months in the first quarter broken down for each month. To Autosum the cells in each column at once:
- Select cells B7:D7.
- Go to Home > (Advanced) Autosum.
- Excel will automatically generate the formulas for columns B to D and enter the results.

How to Autosum Cells in a Row
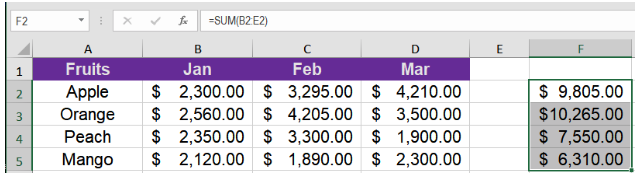
In this example, you have the fruit sales for the first quarter of the year in a horizontal format. To add the data row-wise:
- Select cells F2:F4 by clicking on F2 and dragging it all the way to F4.
- Click Home > Advanced (Autosum).
- Click Enter. Cells F2:F4 will have the sums for each month.
How to Autosum Rows and Columns at the same time
In the previous example, to add up the rows and columns at the same time:
- Select cells B2:F8. Click on B2 and drag it all the way to F8 with your mouse.
- Click the Autosum button from the advanced group in Home.
- This will put the column totals in the last row of the selection, and the row totals in the last column of the selection. It will also put a grand total in the bottom-right corner of the selection.

Using Autosum with Other Functions
Excel’s AutoSum can be used to insert other functions apart from addition. Here’s a list of function supported by Autosum:
- AVERAGE – to return the average (arithmetic mean) of numbers.
- COUNT – to count cells with numbers.
- MAX – to get the largest value.
- MIN – to get the smallest value.
To insert functions, other than SUM, you need to select a cell where you want to insert a formula, click the drop-down near AutoSum, and choose the function you desire from the list.
For example, to find the average sales from the fruit sales:

- Select cell B8.
- Go to Home > (Advanced) Autosum and click on the drop down.
- Select the Average function. This will automatically add B2:B7 in the Average formula.
 This will show the average for each month.

Selecting More Functions from the AutoSum drop down list, Excel will open the Insert Function dialog box. This is the same dialog box that open when you click Insert Function button from the Formulas tab or the fx button from the formula bar.
Autosum-Workflow Basics
Autosum follows a simple predefined algorithm to decide which cells to include in the selection. But it often runs into problems. The main reason behind Excel Autosum not working is using it without knowing how it works.
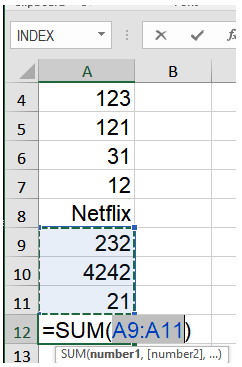
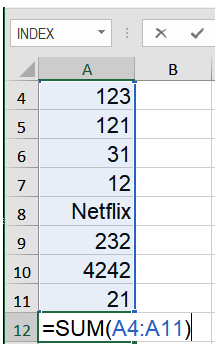
- Autosum can only go up or left, not right or down. This is the first rule to remember using Autosum. Autosum will work in this case:

But not in this case:

- Autosum will stop when it finds an empty cell or a cell that does not have a number. It won’t include the second range in this example:
However, if you select the cells you want to add, the gap will be ignored:

- If you have a value that is not a number in your range, Autosum will stop when it reaches that value.

However, if you select the range, the non-numeric value in the range will be ignored:
An exception to this, autosum will not work if the non-numeric value is an error. The formula used by Autosum will work, but the error will stop it calculating the result.
Still need some help with Excel formatting or have other questions about Excel? Connect with a live Excel expert here for some 1 on 1 help. Your first session is always free.


Leave a Comment