

We can lock and unlock Worksheets and workbooks with or without passwords in Excel. This helps to prevent alterations or accidental deleting of important data in our worksheet or workbook. When we use do this, we can transfer data without fear of modifying, altering, deleting or changing data structure and information.
 Figure 1 – Lock and Unlock Workbooks and Worksheets.
How to Protect Excel Sheet
- We protect the worksheet by navigating to the Review tab
- On the “Changes” group, we will select “Protect Sheet”
 Figure 2a – Click on Protect Sheet
Alternatively, we can place the cursor in the worksheet tab at the bottom of the screen and right click to select “Protect sheet”. Next, in the protect sheet dialog box, we will follow these steps:
- Type a password to protect our Excel sheet. Always make sure to store safely the password elsewhere.
- Next, we will select the kind of actions others can perform on the worksheet.
- We can mark locked and unlocked cells by default so users can carry out these functions.
- We can also mark sorting, formatting, filtering, inserting or deleting rows and columns as well.
- We can also unmark all actions, so users can only view our Worksheet.
 Figure 2b – Use password to protect worksheet
- We click the “OK” button and confirm Password in the next dialog box.
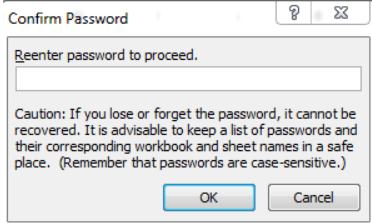 Figure 2c – Confirm password to protect worksheet
- We will have to re-enter password here so we will not lock the Excel sheet forever. Lastly, we will click “OK”
How to protect a workbook in Excel
- To protect a workbook, go to “Review tab”, next “Changes” and click “Protect Workbook” as shown in Figure 2a
- Next, we hover around “Protect workbook for” to pick one or the two options displayed.
- Check “Structure box” so workbooks will retain their size and position.
- Type in desired password (or leave blank) and click “OK”
- Retype password to confirm and select “OK” again.
 Figure 3 – Use password to protect workbook
To unlock a protected workbook in Excel:
- We will select “Protect workbook” from Reviews tab.
- Type password (if password was used before)
- Unmark “Structure” and enter “OK”.
How to Prevent Modifying Action When We Protect Excel Workbook With Password
If we are okay with others using our Excel sheet but we want them to appear in the same structure, we can use these steps:
- Once we are done with the Excel workbook, we will click “Save as”, select “Tools”, and navigate to “General options”
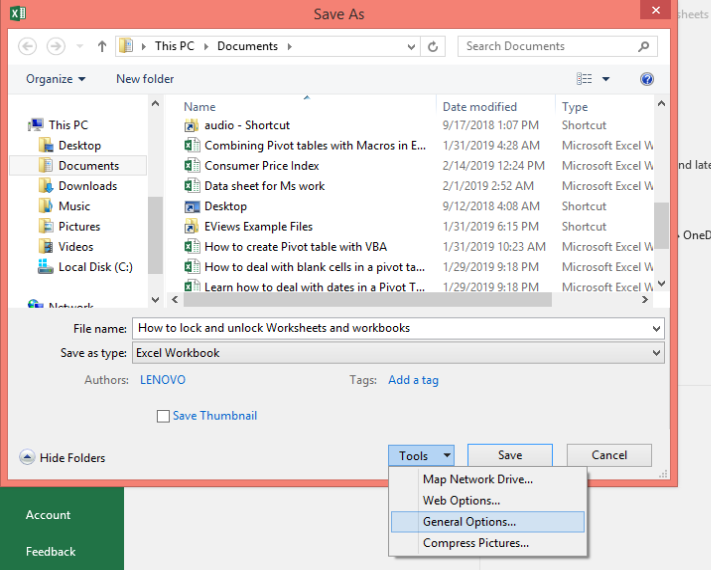 Figure 4 – Protect Excel workbook with Password
- In “General options dialog”, enter password in the “password to modify” option. We can also select “Read only” if we like.
- Click “Save” button in the “Save as” dialog
 Figure 5 – Password to modify option for workbook
Protect Excel Workbook for Modifying and Opening
If we will like to protect Excel workbook for modifying and opening, then we can:
- Click “Save as”, select “Tools”, navigate to “General options”
- In “General options dialog”, enter password in the “password to modify” option. We can also select “Read only” if we like.
- Enter passwords in “Password to open” and “Password to modify” sections. It is recommended to use different passwords for extra security.
- Click “Save” button in the “Save as” dialog.
 Figure 6 – Passwords to modify and open workbook
Remove Password Protection from Excel workbook
- Click “Save as”, select “Tools”, navigate to “General options”
- Delete the passwords from both “Password to open” and “Password to modify” sections. Save the workbook.
How to Unprotect Excel Sheet With or Without Password
If we used the password only to prevent altering the structure of the data, then we can leave the password field empty. Whenever we want to unprotect sheet, we can:
- Right-click on the worksheet tab and select the “unprotect button.” We can also go to the review tab and select unprotect sheet.
- Next, we will go to the home tab, select “Cells” group and click Format. Next, we will pick “Select Unprotect sheet”
 Figure 7 – Select Unprotect sheet
- If the sheet is protected with password, we have to enter the password to unlock the sheet.
 Figure 8 – Unlock password protected worksheet
How to Unlock Using Excel VBA code
To use Excel VBA, we must have Excel 2010 or recent. Next, we will follow these steps:
- Open the Excel document and activate password protect sheet. We must actively use this when we run Excel macro.
- Next, we will press Alt + F11 to see Visual Basic Editor
- Right-click on the workbook name in the left pane and select “Insert >Module”. In the window we see, we will enter the Excel VBA displayed in Figure 9. Lastly we will press F5.
- The macro will return with a cracked password, which can open the document. We will click “OK” to unprotect the sheet.
- If our file has more than one password for each sheet, we can run macro for each sheet to unprotect it.
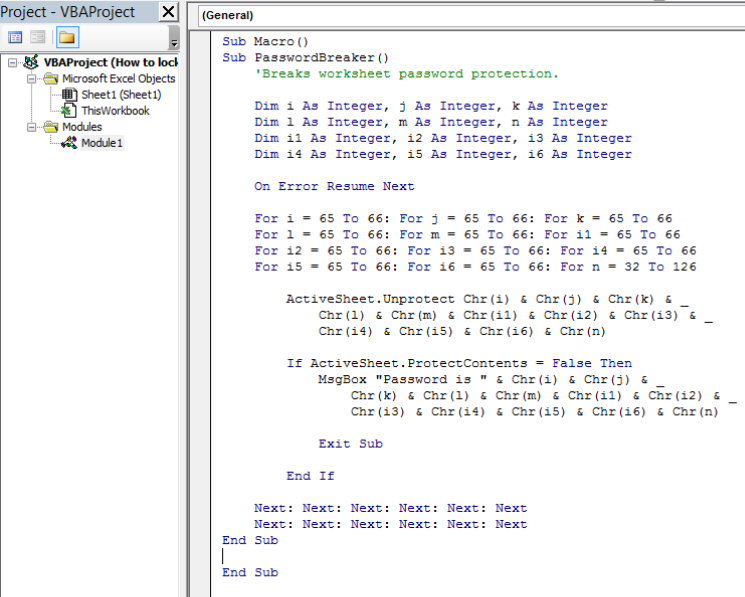 Figure 9 – Using Excel VBA code
How To Unprotect Excel Sheet Without Password For Excel 2013 And Excel 2016
- We will select “Save as” and select Excel 97-2003 workbook format which is (*.xls)
- Next, we will run the macro to unprotect file and save back as its original .xlsx file.
 Figure 10 – Unprotect Excel sheet without password
How to Copy Protected Sheets to Another Worksheet
We can copy from protected sheets using shortcuts but this works with only select locked cells and select unlocked cells action allowed sheets.
- We open the password protected sheet
- Place cursor in Cell A1 and press Shift +Ctrl+ End.
- Next, we press Ctrl + C
- In a new sheet, we press Ctrl + V to paste the contents we copied from the password protected sheet.
- Click to Save workbook
Note
We cannot use the Excel worksheet protection as a security feature. These passwords are easy to break and even someone with a simple Excel VBA code may be able to crack it. Recent versions of Excel such as Excel 2013 and 2016 may offer methods that are more sophisticated but they are equally vulnerable. However, they can still be a bit effective if we stick to the following rules:
- Ensure to protect workbook structure so others cannot delete, unhide, add, rename or move sheets
- Encrypt workbook with separate passwords in modifying and opening workbook for work-book level security
- Make use of Excel 2010, 2013 and 2013 versions alongside advanced data encryption mechanisms
- Never store very sensitive Excel documents in just any location. Make use of encrypted hard drives.
- Use strong passwords with varying numeric characters, alphabets and symbols.
Most of the time, the problem you will need to solve will be more complex than a simple application of a formula or function. If you want to save hours of research and frustration, try our live Excelchat service! Our Excel Experts are available 24/7 to answer any Excel question you may have. We guarantee a connection within 30 seconds and a customized solution within 20 minutes.


Leave a Comment