

We can set a print area to print only a certain part of our sheet. By following the simple steps below, this tutorial will walk all Excel users through the process of:
- How to set the print area or how to print a range
- How to change print area
- How to clear a print area.
 Figure 1: How to Set Print Area
What is Print Area?
A print area consists of a range of cells that we select to print when we don’t want to print the whole worksheet. After we have defined the print area, only that area will be printed. It is also possible to change the print area by adding cells to the print area or clearing the entire print area to print the full worksheet.
How to Set Print Area
In setting print area, we will do the following:
- Select the range of cells that we want to set as the print area
- Click Page layout
 Figure 2: Clicking Page Layout for Setting Print Area
- We will click Print Area as shown in figure 2 and select Set Print Area
- The selected range of cells is now set as the print area. When we print this worksheet, only these cells will show. We can confirm by checking the Name manager
- We will click Formulas
 Figure 3: Click Formulas for Set Print Area Confirmation
- We will click Name manager
 Figure 4: Name Manager dialog box showing the Print Area
Notes
- We can have many print areas in a single worksheet. Each print area prints separately.
- To print more than one Excel print area, press the CONTROL KEY and highlight the areas.
- Assuming we set print area in SHEET 1, that print area is only for sheet 1. We can set several print areas for different sheets in the same workbook.
- The print areas are saved when we save the workbook and remains active when reopened.
How to Change the Print Area
We can add cells to a current print area by doing the following:
- We will select the range of cells we want to add
- We will click on Page layout
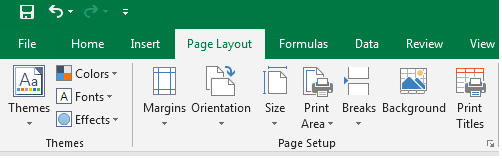 Figure 5: Clicking Page Layout for Changing Print Area
- We will click Print Area as shown in figure 5 and select Add Print Area
- The selected range of cells is now set as the print area. When we print this worksheet, only these cells will show. We can confirm by checking the Name manager
Notes
- We can only use the Add Print Area option if we have an existing print area for the worksheet. This will adjust the print area to contain the new cells
- The new print area must be adjacent to the former print area, else, Excel will generate a new print area. This new print area will print on a separate page. If the new print area is adjacent to the former print area, both print areas are merged and the printing occurs on the same sheet.
How to Clear the Print Area
We will click anyplace in the Excel sheet where we want to clear the print area
- We will click Page layout
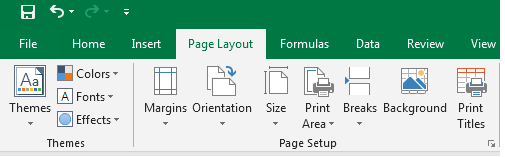 Figure 6: Clear Print Area
- We will click Print Area as shown in figure 6 and select Clear Print Area
Note
If we want to clear the print areas of only specific cells, we can do this by editing the name range of the areas in the name manager.
Instant Connection to an Expert through our Excelchat Service
Most of the time, the problem you will need to solve will be more complex than a simple application of a formula or function. If you want to save hours of research and frustration, try our live Excelchat service! Our Excel Experts are available 24/7 to answer any Excel question you may have. We guarantee a connection within 30 seconds and a customized solution within 20 minutes.


Leave a Comment