

Subtracting or adding months to any date can be done in Excel by using the EDATE function. This function is especially useful when determining maturity or due dates. This tutorial will assist all levels of Excel users in the usage and syntax of EDATE function.
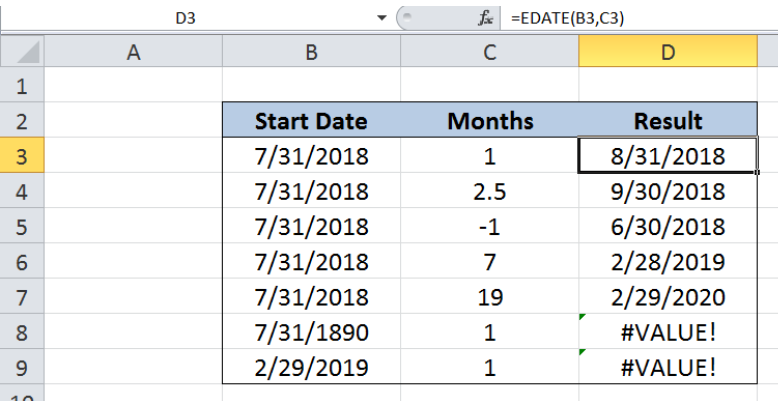 Figure 1. Final result: Excel EDATE function
Syntax of the EDATE Function
EDATE adds or subtracts a certain number of months before or after a specified date; returns a date falling on the same day as the specified date
=EDATE(start_date, months)
- start_date – a date representing the start date; can be a date enclosed in quotation marks or a cell reference
- months – the number of months either before or after the start date; a positive value results to a future date while a negative value pertains to a past date
- If months is not an integer, the truncated value is used by the function
- The date must be between January 1, 1900 and December 31, 9999
- If start_date is not a valid date, EDATE returns the #VALUE! error value.
Setting up our Data
Our table contains three columns: Start Date (column B), Months (column C) and Result (column D). We want to determine the future or past date corresponding to the start date in column B and the number of months in column C. The results will be recorded in column D.
 Figure 2. Sample data for Excel EDATE function
Determine desired date using EDATE
We want to determine our desire dates by using the EDATE function. Let us follow these steps:
Step 1. Select cell D3
Step 2. Enter the formula: =EDATE(B3,C3)
Step 3. Press ENTER
Step 4: Copy the formula in cell D3 to cells D4:D9 by clicking the “+” icon at the bottom-right corner of cell D3 and dragging it down
 Figure 3. Entering the formula to get desired date using the EDATE function
EDATE easily returns the date “8/31/2018” in cell D3, which is one month after July 31, 2018.
However, for the next example, the number of months is 2.5, which is not an integer. EDATE truncates this value and interprets the number of months as 2. As a result, the date in cell D4 is “9/30/2018”, which is two months from our start date.
Note also that our function returns valid dates, and adjusts the month, day and year accordingly. The last day of September is 30, not 31. Hence the result “9/30/2018”.
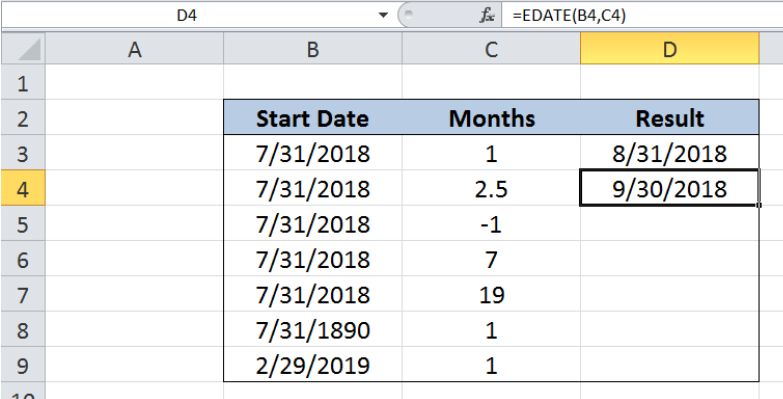 Figure 4. EDATE truncates non-integer values for months
The same principle is shown in the next two examples where the results in D5 and D6 are “6/30/2018” and “2/28/2019”, respectively. The last day of June is 30 while the last day of February 2019 is 28, not 31.
 Figure 5. EDATE returns valid dates accordingly
The EDATE function also considers leap years, as shown in the next example. The year 2020 is a leap year and adds one more day to the month of February, making its last day “29” instead of “28”.
 Figure 6. EDATE returns valid dates on a leap year
Note
The EDATE function returns the error #VALUE! when the start date is invalid. In cell B8, the date “7/31/1890” is not valid because the function only allows dates between January 1, 1900 and December 31, 9999.
Cell B9 is also invalid because “2/29/2019” does not exist. The last day of the month of February in 2019 is 28, not 29.
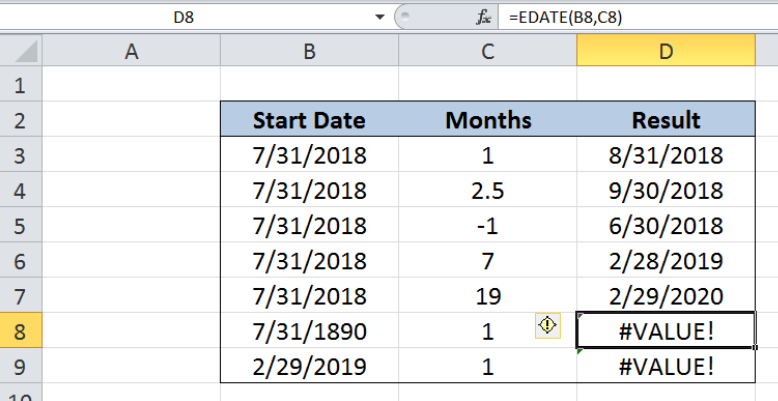 Figure 7. EDATE returns an error for invalid start dates
Most of the time, the problem you will need to solve will be more complex than a simple application of a formula or function. If you want to save hours of research and frustration, try our live Excelchat service! Our Excel Experts are available 24/7 to answer any Excel question you may have. We guarantee a connection within 30 seconds and a customized solution within 20 minutes.


Leave a Comment